Author: mari

  • I Tried 5 Best WordPress Community Plugins (So You Don’t Have To)

    I Tried 5 Best WordPress Community Plugins (So You Don’t Have To)

    A lot of people try to build online communities in WordPress, but most never gain traction. The problem usually isn’t the idea—it’s the setup. Without the right platform, it’s hard to spark real conversations or keep your members engaged over time.

    That’s why choosing the right community plugin matters so much. It can turn a quiet website into an active space where people want to join conversations, share ideas, and keep coming back.

    To find out what really works, I’ve spent weeks testing and comparing the top WordPress community plugins available today. I installed each one on a real WordPress site, created test communities, and put them through scenarios that mirror what actual site owners face.

    In this post, I’m sharing my top picks to help you create a thriving, vibrant online community.

    I Tried Best WordPress Community Plugins

    Quick Overview – The Best WordPress Community Plugins

    If you’re in a hurry, here’s my quick pick:

    Plugin Starting Price Best For Key Feature
    BuddyBoss $299-$449/year Building a full-featured social network Member profiles with customizable fields
    MemberPress Starts at $179.50/year Creating premium membership communities Unlimited membership plans with flexible rules
    BuddyPress Free Building online communities for free User-created social groups with activity streams
    Thrive Comments $49/year (standalone) or $299/year as part of the Thrive Suite Boosting comment engagement Comment upvoting and gamification system
    AccessAlly Starts at $745/year Online courses with built-in communities All-in-one membership and LMS system

    Why Build an Online Community?

    Building an online community can turn your WordPress website into an interactive space where visitors become active participants. Instead of just reading your content and leaving, users can connect and build relationships around your brand.

    Here are the main benefits of creating an online community:

    • More user engagement: Forums, groups, and member profiles give visitors specific, strong reasons to keep coming back to your community.
    • Brand loyalty: Active community members often become your biggest supporters. This may involve taking positive actions like posting comments, engaging with you on social media, or even buying your products. I’ve spoken to many store owners who say their community members are their best repeat customers.
    • Your community creates valuable content for you: Every discussion and comment from your members is fresh, user-generated content for your website. Search engines are now giving higher rankings to this type of authentic content, which can improve your SEO and bring more visitors to your site. This is the same model that helps power popular communities like Reddit and Quora.
    • Create revenue opportunities: You can set up new income sources like paid memberships, online courses, and members-only content.
    Why Use WordPress for Your Online Community?

    Building your community on WordPress gives you full control. Everything, from your member data to your content, stays on your site instead of a hosted platform that can change its rules or shut down overnight.

    It also keeps your community close to the rest of your website. Members can move easily between your blog, store, and online courses without having to log in to another platform.

    Hosted platforms like Discord or Mighty Networks may seem easier at first, but you don’t own the platform, can’t customize it freely, and have to work around their pricing and feature limits. With WordPress, you set the rules and keep full control over how your community grows.

    My Testing Methodology for Evaluating Community Plugins

    Choosing the wrong community plugin can kill engagement before it even starts. I know this from personal experience: when I first tried to launch a forum, I ended up with silent, empty pages and zero activity.

    That’s why I don’t just look at a plugin’s list of features. Instead, I personally build test communities and put each plugin through real-life scenarios that mirror what you’ll face as a site owner.

    Here’s how I test every plugin in this review:

    • Installation and setup time: I track how long it takes me to get a basic community up and running. I also make a note of any technical roadblocks that might confuse someone who is just starting out.
    • User experience testing: I always create a test member account and approach the community just like a new user would. This helps me check if the features feel easy to use, or if they’re confusing.
    • Performance impact: I run a website speed test before and after I install the plugin. This is because community features can slow down your site if they’re not set up properly.
    • Mobile responsiveness: I test every feature on mobile devices, as most community interactions happen on phones and tablets.
    • Scalability potential: I try to simulate what happens when a community grows quickly. In this way, I can see how each plugin handles lots of new members and content.
    • Value for money: I compare total cost to capability: upfront license prices, any add-ons you’ll likely need, hosting requirements, and how much you can accomplish at each tier as your community grows.

    My main goal is to find plugins that are simple and work well for beginners, but can also grow with your community as you get more members.

    1. BuddyBoss: Best WordPress Community Plugin for Building a Full-Featured Social Network

    BuddyBoss – Best WordPress Community Plugin for Building a Full-Featured Social Network
    BuddyBoss Pros ✅ All-in-one solution for building social networks
    ✅ Modern and user-friendly design, right out of the box
    ✅ Optional mobile app for native community experience
    ✅ Strong integration with e-learning and membership tools
    BuddyBoss Cons ❌ Can be resource-intensive and needs powerful web hosting
    ❌ Higher cost compared to simpler forum plugins
    ❌ Mobile app is a separate and significant additional expense
    Pricing $299–$449/year
    Best For Building a comprehensive social network similar to a private Facebook

    BuddyBoss is the best community plugin for creating an ‘all-in-one’ social network directly inside your WordPress site. It allows you to build your own social media website, including features such as detailed activity feeds, private messaging, profiles, groups, and events.

    I’ve tested BuddyBoss extensively, and it stands out for its clean, modern design and rich user-facing features. For more details, you can see my complete BuddyBoss review.

    Quick Note: Keep in mind that BuddyBoss costs more upfront than other options on this list, but I believe that you get a lot of value for money. Instead of juggling separate plugins for social feeds, groups, messaging, and gamification, you get everything in one integrated system.

    When you factor in the time and setup savings, BuddyBoss is one of the best long-term investments for building a thriving online community.

    My Experience

    The initial setup process was very straightforward, and I didn’t need any technical expertise to get BuddyBoss up and running. I also really appreciated that the plugin looked great, right out of the box.

    An example of a community site, created using BuddyBoss

    When I tested its activity feeds, I was impressed by how seamlessly recent posts and comments flowed across all areas of my community.

    I also liked that you can create an online school with collaborative learning, gamification, and an engaging student dashboard to improve the learner experience.

    Another benefit is that BuddyBoss allows you to turn your community website into an app. This can be a great option for boosting engagement and getting more signups.

    Just keep in mind that BuddyBoss tends to use a lot of server resources, so you’ll need powerful WordPress hosting to run it well. I recommend using Rapyd Cloud hosting since they have a plan designed specifically for BuddyBoss.

    Why I Recommend BuddyBoss: This plugin creates an easy-to-use social network experience for your visitors. In my opinion, BuddyBoss’s biggest strength is combining all the essential community features into one modern, well-integrated platform.

    2. MemberPress: Best for Creating a Premium Membership Community

    MemberPress: The Best WordPress Plugin for Creating a Premium Community
    MemberPress Pros ✅ Easy to set up and manage for beginners
    ✅ Flexible content access rules
    ✅ Seamless integration with other community plugins
    ✅ Courses addon for learning communities
    MemberPress Cons ❌ No free version available
    ❌ Not designed for creating social media websites
    Pricing Starts at $179.50/year
    Best For Building paid membership communities with exclusive content access

    MemberPress is a powerful membership plugin that allows you to set up premium membership communities. It gives you precise control over who sees your content, including online courses, videos, and members-only discussion forums.

    At WPBeginner, we use MemberPress for our video training site, even though the content is free. This proves you can use MemberPress to manage any kind of community, no matter whether you charge a fee or not.

    For more details on our experience, see our complete MemberPress review.

    An example of WPBeginner's video course website, managed using MemberPress
    My Experience

    When I set up MemberPress on my website, the installation process was incredibly straightforward. MemberPress showed me how to create membership tiers and set access rules without any confusion.

    Unlike other membership plugins I’ve tried, MemberPress made it simple to restrict specific pages and posts. I could easily decide which content members could access with just a few clicks.

    Restricting content on your wedding website using MemberPress

    The integration with payment gateways like Stripe worked without any technical headaches.

    I experimented with setting up different payment options, and the whole process was incredibly straightforward.

    How to accept Stripe payments using MemberPress

    I also really like MemberPress’ drip content feature. It lets you schedule lessons to be released slowly over time, which is a great way to keep members engaged over the long term.

    Plus, it supports many different integrations, including with online community software like BuddyBoss, BuddyPress, and Discord.

    Why I Recommend MemberPress: This plugin makes it easy to create any kind of community membership website. MemberPress also works perfectly with other community tools you might want to add later on.

    3. BuddyPress: Best for Building a Free Social Network

    BuddyPress – Best WordPress Community Plugin for Building a Free Social Network
    BuddyPress Pros ✅ 100% free and open-source
    ✅ Very flexible and customizable for different community types
    ✅ Integrates seamlessly with bbPress for discussion forums
    BuddyPress Cons ❌ Basic default design that relies heavily on your WordPress theme
    ❌ Key features like monetization require additional plugins
    ❌ Limited advanced features
    Pricing Free
    Best For Best free option for building social networks with member profiles and groups

    BuddyPress is the best free and open-source tool for creating social networks. It gives you basic online community features without any licensing costs.

    Unlike premium alternatives I’ve tested, BuddyPress focuses on providing a stable, solid foundation rather than lots of flashy features.

    My Experience

    I used BuddyPress to build a test site where WordPress fans could connect with each other. BuddyPress immediately gave me reliable features like group creation, friendship systems, and member notifications right out of the box.

    Post a message on the activity page in BuddyPress

    BuddyPress’ core features worked very well, letting me create public, private, and hidden groups without any difficult setup.

    I also easily integrated it with the free bbPress plugin to add discussion forums directly inside my social groups. I believe this combination is key, as it makes the community experience feel more complete.

    Keep in mind that the default styling is basic, which I think is a fair trade-off for being free. For site owners who are comfortable with adding some minor styling changes, BuddyPress is a great option.

    Why I Recommend BuddyPress: This plugin gives you essential social features completely free. Overall, BuddyPress is perfect if you’re on a tight budget or just starting out.

    4. Thrive Comments: Best WordPress Community Plugin for Boosting Engagement

    Thrive Comments – Best WordPress Community Plugin for Boosting Engagement
    Thrive Comments Pros ✅ Transforms standard comments into interactive discussions
    ✅ Gamification features encourage user participation
    ✅ Post-comment actions help convert readers into subscribers
    Thrive Comments Cons ❌ Can add extra weight to high-traffic pages
    ❌ Engagement data may be lost if you deactivate the plugin
    ❌ No free plugin version
    Pricing $49/year (standalone) or $299/year as part of the Thrive Suite
    Best For Converting a blog comments section into a community hub that drives engagement and captures leads

    Thrive Comments is the best solution for turning your regular blog comment section into an engaging community space.

    Instead of the basic WordPress comments that most visitors simply ignore, Thrive creates an interactive environment where readers genuinely want to participate. For example, it includes comment likes / dislikes, comment badges, and more.

    For more about our experience with Thrive Comments, see our full Thrive Themes Suite review.

    My Experience

    To test how well Thrive Comments performs, I loaded a review page that I had intentionally filled with over 300 comments. Thrive’s built-in lazy loading feature worked exactly as advertised, keeping the initial page load fast and snappy.

    Plus, I liked that Thrive Comments includes handy upvoting and downvoting features that help highlight the most valuable responses. Quality comments naturally rise to the top, encouraging better discussions.

    An example of an enhanced comment system on a WordPress blog or website

    During my testing, I also found Thrive’s built-in gamification system to be very effective at encouraging participation.

    Users can earn badges based on their activity, which adds an element of fun that keeps people coming back to engage and see their progress.

    Comment badges

    I was also really impressed by the post-comment actions, which instantly turn engaged commenters into potential email subscribers. After someone leaves a thoughtful comment, you can automatically redirect them to a special thank you page or show them an optin form.

    Why I Recommend Thrive Comments: This plugin successfully turns your passive blog readers into active community members. Plus, its ability to capture email subscribers from your most engaged visitors is a huge bonus.

    5. AccessAlly: Best WordPress Plugin for All-in-One Courses and Communities

    AccessAlly – Best WordPress Plugin for All-in-One Courses and Communities
    AccessAlly Pros ✅ Combines membership, course, and community features in one platform
    ✅ Built-in CommunityAlly add-on adds group feeds, discussions, and member directories
    ✅ Excellent for gamification, progress tracking, and engagement challenges
    ✅ CRM and email automation integrations
    AccessAlly Cons ❌ Has a steep learning curve
    ❌ Community features require the CommunityAlly add-on
    ❌ More expensive than other community plugins
    Pricing Starts at $745/year
    Best For Coaches, educators, and membership site owners who want courses, communities, and automation in one tool

    AccessAlly is one of the most complete WordPress solutions for building online learning communities. Its CommunityAlly add-on allows you to set up group feeds, member profiles, and discussion areas directly inside your online course or membership area.

    My Experience

    To test AccessAlly, I tried building a small group learning community with discussion groups linked to specific courses. Setting it up took more time than with simpler plugins, but the extra control over structure made it worth it.

    Each group automatically added or removed members based on course enrollment, and users could post updates or start discussions inside their cohort.

    Group automatically added to Content Pages

    I also liked that AccessAlly includes strong gamification tools. I was able to award points when members completed lessons or participated in discussions, and set up leaderboards for each community.

    Just keep in mind that AccessAlly is more expensive and complex than some of the other community plugins on this list. I think it could be worth it for larger companies or professional coaches, but it may not be the best fit for small businesses.

    Why I Recommend AccessAlly: It’s ideal for managing courses, memberships, and community spaces in one system. AccessAlly offers deeper engagement tools than most LMS or membership plugins, and its automation options make it easy to grow an active, loyal community over time.

    Other Community Plugins I Tested

    If you’re still exploring your options, here are a few other plugins worth mentioning.

    These didn’t make my top recommendations, but they can work well in specific situations or for smaller projects.

    wpForo Forum

    Best For: Traditional forums and discussion boards

    wpForo logo

    The Good: Clean forum structure, built-in SEO tools, and migration options from bbPress.
    The Bad: Limited social features and requires paid addons for advanced layouts or private messaging.
    Suitable For: Online communities looking for a classic discussion-board format with moderation tools.

    ProfileGrid

    Best For: Small social networks and member directories

    ProfileGrid logo

    The Good: Combines user profiles, private groups, and messaging in one plugin. Includes WooCommerce and membership extensions.
    The Bad: The interface feels dated, and customization options can be confusing for beginners.
    Suitable For: Niche or small-scale communities where user profiles and group chats matter more than large-scale discussions.

    Ultimate Member

    Best For: Membership sites with social profile features

    Ultimate Member logo

    The Good: Custom user roles, registration forms, and profile customization. Integrates with WooCommerce and LearnDash.
    The Bad: Can conflict with other plugins and may need paid extensions for features like private messaging.
    Suitable For: Membership communities that require flexible profile management and role-based access, rather than full social feeds or forums.

    FluentCommunity

    Best For: All-in-one social community and course platform.

    FluentCommunity logo

    The Good: Includes activity feeds, spaces, chats, polls, leaderboards, and full LMS tools. Deeply integrated with the Fluent suite for automations and email engagement.
    The Bad: Newer product with a smaller ecosystem and fewer third-party extensions than BuddyBoss or MemberPress.
    Best For: Building a modern online community and course hub without relying on multiple plugins.

    What Is the Best WordPress Community Plugin?

    The best plugin for you really depends on what kind of community you’re trying to build. This will vary depending on whether you want to focus on online training, selling premium content, creating a free social network, or something else entirely.

    Here is a quick summary:

    • If you want to build a social network on WordPress, then BuddyBoss is my top pick. It’s an all-in-one solution that promises to transform your site into an engaging community, similar to a private Facebook that you fully own.
    • If you want to create a premium, paid community, then MemberPress really stands out. It’s what I recommend if you need simple-to-use content restriction and powerful subscription management.
    • If you want to focus on online learning, then AccessAlly is my top pick. It allows you to build communities within your online courses and encourage group learning.
    • If you want to build a community without paying any license fees, BuddyPress is the perfect option. This free, open-source foundation gives you core features like profiles, groups, and activity feeds. I also recommend adding the free bbPress plugin if you need discussion forums.

    Frequently Asked Questions About Online Communities

    Choosing the right tools for your online community can be confusing, so it’s completely normal to still have some questions.

    To help you out, I’ve gathered answers to the most common questions our readers ask us about running a community on WordPress.

    Do I need special hosting for running online communities on WordPress?

    Yes, you’ll need reliable, high-performance hosting for running an active WordPress community. Community plugins process constant activity, like posts, messages, and notifications, that can quickly slow down basic shared hosting.

    I recommend Rapyd Cloud. It’s built for high-traffic, dynamic websites and handled resource-heavy plugins like BuddyBoss smoothly in my tests.

    Can I monetize my WordPress community?

    Yes, absolutely! In my experience, the best way to make money online is by using a membership plugin to sell access to your content or community groups.

    Tools like MemberPress and AccessAlly all provide the necessary features to handle this. These plugins offer simple subscription management, detailed content protection to lock down exclusive posts, and other features you need to run a successful paid community.

    Which is the best free WordPress community plugin?

    BuddyPress is the best free option. It’s open source and very well-documented by the larger WordPress community.

    More Resources for Building WordPress Communities

    My biggest advice is to remember that these plugins are just the starting point. Building a successful WordPress community requires finding the right mix of tools, smart hosting, and genuine engagement strategies.

    With that said, I recommend using the resources below to improve your site and grow your brand-new community:

    If you liked this article, then please subscribe to our YouTube Channel for WordPress video tutorials. You can also find us on Twitter and Facebook.

    The post I Tried 5 Best WordPress Community Plugins (So You Don’t Have To) first appeared on WPBeginner.

  • Matt: On Money Stuff

    There are a few writers who I follow religiously, and one is Matt Levine of Bloomberg’s Money Stuff. For business and finance it’s one of the smartest and funniest things you can read. Yesterday, I think for the first time, he mentioned WordPress! In the context of his quote on this great X thread about how the Polymarket insider predicted the Nobel peace prize winner.

    This trader apparently didn’t have inside information, in the traditional bad sense of like bribing a Nobel committee staffer. Instead, web scraping:

    “The Nobel site runs on WordPress. Like many WordPress setups, it has an XML sitemap that lists every indexable page, even ones not yet public. If someone were monitoring this sitemap, they could easily notice a new page appear, something like “http://nobelprize.org/prizes/peace/2025/machado/facts/”

    If you run a WordPress site and want the best advice in the world for how to avoid this sort of thing, I highly recommend our enterprise WordPress VIP service! They help run some of the largest and most secure WordPress sites in the world, and could easily help navigate avoiding something like this from happening. WordPress is easy and cheap to run everywhere, even on a Raspberry Pi, but you get what you pay for, and any serious organization or mission-critical website should be on VIP.

  • Matt: The Curse of the Muse

    Some days, like this morning when I almost missed my flight to WordCamp Canada in Ottawa, I’m so overwhelmed with the maelstrom of ideas and sparks of creation that it feels like waves crashing against a dam. There are so many ways I can imagine new software, new products, new ways for the world to be.

    This is a beautiful process, but it’s also painful! The anguish and agony arise as you attempt to distill the ideas and sparks; the creativity dims, and the beauty and perfection of the original inspiration fade, as I try to translate it into something that can become real and be legible to others. That’s why I have to drop everything when inspiration strikes, because if I try to return to it later, I find the muse has left and I can’t bottle that energy anymore. (There’s a reason Eric, Tantek, and I put “muse” into the XFN standard!)

    To the extent I’ve been successful at all in my life, it is because I’m able to contain this tornado and break it down into plans, business models, people, and teams.  I’ve never done anything useful on my own; it’s always been in conversation and partnership with others. 

    I’m grateful to everyone I work with across Automattic, WordPress, Audrey, TinkerTendo, Keys, The Institute, Illuminate, EcoAmerica, Field Effect (in Ottawa!), as well as all my friends and professional connections. They are the ones that help me shape this energy into things that actually have an impact in the world and aren’t just fever dreams.

    This essay itself had hundreds more words, but I have to edit, delete delete delete, trim things down.

  • WPTavern: #189 – Weston Ruter on Unlocking WordPress Performance

    Transcript

    [00:00:19] Nathan Wrigley: Welcome to the Jukebox Podcast from WP Tavern. My name is Nathan Wrigley.

    Jukebox is a podcast which is dedicated to all things WordPress. The people, the events, the plugins, the blocks, the themes, and in this case how WordPress Core continues to strive to unlock greater performance.

    If you’d like to subscribe to the podcast, you can do that by searching for WP Tavern in your podcast player of choice, or by going to wptavern.com/feed/podcast, and you can copy that URL into most podcast players.

    If you have a topic that you’d like us to feature on the podcast, I’m keen to hear from you and hopefully get you, or your idea, featured on the show. Head to wptavern.com/contact/jukebox, and use the form there.

    So on the podcast today, we have Weston Ruter. Weston is a longtime WordPress user and contributor. He has been a core committer for 10 years, and he co-led the WordPress 4.9 release. He worked in the WordPress agency space, and has also been sponsored to work on the Core Performance Team. He lives in Portland, which as you will hear, was quite handy for this interview.

    We start the conversation by getting into the big picture, why website speed matters more now than ever, and how WordPress performs out of the box. Weston shares details about measuring true performance. Revealing, for example, that achieving a perfect Lighthouse score isn’t the end game, and that real user experience metrics like Core Web Vitals and Largest Contentful Paint should shape how developers and site owners think about optimization.

    Throughout the episode, you’ll learn about the advances made by the WordPress Performance Team, from lazy loading and new image formats, to speculative loading that shaves precious milliseconds off page transitions. Weston explains how many performance improvements are designed to work automatically, democratizing speed, so that even casual WordPress users benefit without needing to be technical experts.

    The conversation also touches on the balance between adding features and avoiding plugin bloat. The hidden impact of browser and device differences, and how large companies, like Google, are working hand in hand with WordPress to raise the bar on speed and usability.

    Weston offers practical tips, deep technical wisdom, and a glimpse of where WordPress performance is heading next, and it’s sure to inspire you to think differently about how your sites load, how your users engage, and how you can squeeze out every last drop of speed from the platform you love.

    Whether you’re a developer, designer, site owner, or just someone curious about what keeps the web running smoothly. This episode is for you.

    If you’re interested in finding out more, you can find all of the links in the show notes by heading to wptavern.com/podcast, where you’ll find all the other episodes as well.

    And so without further delay, I bring you Weston Ruter.

    I am joined on the podcast by Weston Ruter. Hello.

    [00:03:28] Weston Ruter: Thank you for having me.

    [00:03:29] Nathan Wrigley: You are very welcome. I’m quite jealous of Weston because we’re in Portland, Oregon at WordCamp US. I had to get on a plane, which was no hardship really in the grand scheme of things. Nevertheless, it was a lengthy plane journey. You, on the other hand, had to get on some public transport to get here because you live in Portland. That must be nice

    [00:03:45] Weston Ruter: I live about five miles to the east of here, and so I jumped on the bus and I got off and walked to coffee shop and over to the conference center.

    [00:03:53] Nathan Wrigley: And twice, two years in a row as well. You’re very, very lucky.

    [00:03:56] Weston Ruter: I was very happy when I found out.

    [00:03:57] Nathan Wrigley: Yeah. So Weston’s here today because of a presentation that he’s giving at WordCamp US. I will read into the record the title of the presentation that you’re giving, The Site Speed Frontier with Performance Lab and Beyond. So it’s all about performance, this episode essentially.

    This is one of those subjects where I feel you have to tell us your credentials so that we understand that what you are saying is true. Because I think there’s a lot of snake oil, certainly from my point of view, quite a lot of ignorance. I don’t really understand this topic inside and out. So would you mind, a minute or something like that? Just tell us about you and your history with, well, WordPress, but also performance and so on.

    [00:04:32] Weston Ruter: Yeah, sure. I have been a WordPress Core committer for 10 years. And I was in the agency space working at XWP, working on enterprise WordPress sites. And then I joined Google and I was a software engineer working on developer programs engineer, then develop a relations engineer working on the AMP project, which is all about making webpages faster using the AMP framework. And from there I transitioned into working on the Core Performance Team for the past couple years. And we are focused on making WordPress fast for everybody.

    [00:05:15] Nathan Wrigley: Okay, great. Thank you so much. So the topic at hand then is going to be about performance. Why are you interested in this? I know obviously there’s a career in it and what have you. Is this something that you lie awake at night thinking about? Do you obsess about this kind of stuff?

    [00:05:28] Weston Ruter: Yeah, it’s a passion of mine because who likes a slow webpage, right? So it’s fun to eke every bit of performance out of the loading of something. There’s a lot of little technical details and things to know and best practices to observe. And so it’s a fun challenge to be as fast as possible and there’s always room for improvement.

    [00:05:52] Nathan Wrigley: And it kind of feels as if the mantra over many, many years has basically been that, you know, if you can make your website faster, it will be successful. People will visit it, people are getting weary of page load time or what have you. And so maybe we’ll get into the weeds of all of that.

    How does WordPress, if I was just to go, okay, ignore the hosting that it’s on. Let’s just imagine we’ve got a good host, we’ll just use that term. If I was to download a vanilla version of WordPress and use the default theme, currently 2025, and do nothing else with it, I’ve written a few blog posts, maybe that’s it. How does it do out of the box like that?

    [00:06:25] Weston Ruter: Yeah, it turns out my talk is exactly about this, and it uses the 2025 theme as a test case to show how the performance of WordPress fares out of the box. And if you were to load up a site running 2025, the theme and nothing else, and you run it through Lighthouse, the performance testing tool from Google, you’ll most likely get a 100 score, performance score. And you would think, I’m done, there’s nothing else to do. But if you dig into it, just because you get a good score, that doesn’t mean there’s still not room for improvement. And there’s still head room even after 100.

    But yeah, WordPress Core does great out of the box, but there are still many opportunities to make it even faster. And as you had Felix on previously to talk about speculative loading, that’s one example where the performance is improved yet further. And in the performance lab plugin, which the performance team maintains, we have different performance feature plugins that implement additional optimisations that address different scenarios and use cases that WordPress doesn’t do well out of the box.

    [00:07:40] Nathan Wrigley: It’s kind of interesting, and I’ve never heard it framed that way. I’ve never heard that there was a ceiling above 100. It kind of feels as if that is the ceiling. If you score 100, all bets are off, game over, you’ve succeeded, hooray, have a party, kind of thing. But no, there’s still room to be squeezing a little bit out here and there.

    [00:07:57] Weston Ruter: Yeah, if you look at a Lighthouse audit, Lighthouse is an example of a lab metric. It simulates a page load for a user, but it’s not an actual page load for an actual user. It’s just a simulation. And if you really want to know how your site is actually performing, you need to measure those visits from actual users.

    And if you load up a popular site in Google’s page speed insights tool, you’ll see there’s two different sections on the page. At the top, you’ll see what users are experiencing, and then at the bottom you’ll see lab data. And the top is coming from actual site visitors through what’s called the Chrome User Experience Report. And that tells you how the site is performing in terms of the Core Web Vitals that Google has spearheaded.

    And one of those is called the Largest Contentful Paint or LCP, and that measures the time it takes for the largest element that is most likely going to be the main content of the page to be rendered, from the time you start navigating to the page and that element finishes rendering.

    And a good LCP value is considered from 0 to 2.5 seconds. And so you can have, within 2.5 seconds there’s a big range in the user experience. So if it’s just under 2.5 seconds, it’s considered good, but that doesn’t mean a 1.5 second page load is actually way better, and a 0.5 second page load is even better yet, and a 0.05 second page load is great, is perfect. That would be the perfection. And that is what we’re working on.

    [00:09:36] Nathan Wrigley: There’s gradations of it, okay. So within that 100 there may be room to do, aspects of the 100 can be improved. And in this case, by taking the LCP time down.

    We’re at a conference event. There’s over a thousand people. There must be designers, developers, SEO people here. There’s everybody. There’s the whole gamut of people that use WordPress, probably some people that are new to the whole platform as well. Do you think that performance is something that everybody needs to worry about or are you happy to be one of the few that obsess about it? Is it basically better to leave an expert like yourself to worry about it, or is this something that we can all have a little dabble at and be successful about?

    [00:10:14] Weston Ruter: Well, that’s what we’re concerned about with the Core Performance Team is making it so that the regular WordPress user doesn’t have to worry about this, because nobody’s got time to spend learning like, what is LCP? What is time to first bite? What are these different metrics? And nobody has time to worry about optimising for all these. So WordPress Core should do all this out of the box, and the WordPress ecosystem should implement best practices so that users don’t have to worry about it.

    [00:10:44] Nathan Wrigley: It’s kind of interesting. I remember, I’m thinking it was about six years ago, but I don’t really remember the date. But Google kind of informed everybody that in a period of time, a year’s time or what have you, these metrics, LCP and, Core Web Vitals basically were going to come in.

    And it felt like everybody in our industry was running around like a headless chicken, trying to understand something that they knew, there was this sword of Damocles moment, this date in the calendar where the SERPs were going to change. It didn’t feel like a comfortable time. In some senses, it felt like Google was kind of poisoning the water a bit because they were alienating developers who suddenly had to learn this new thing, because they realised their client websites were going to probably tumble in the SERPs.

    And so they had to upskill in this thing that probably they didn’t want to be involved with. So it was a curious time, but the dust seems to have settled. I don’t know too much about, you know, whether they were penalties that really were paid by people because they didn’t have these fabulous Core Web Vital scores. But it definitely put the cat amongst the pigeons for a while anyway.

    [00:11:38] Weston Ruter: The factors that go into ranking pages and Google search are, I never knew what they are, so the knowledge I have is that the performance of a page contributes to the ranking in some way. And basically, as I understand it, all things being equal, you have two sites with the same content and same relevance to the user, and one has better performance, then in theory that would rank higher.

    How much value you get in terms of your ranking is debatable or unknown. I don’t know. But what is important is the user experience and the benefits that you get for your users. And if they have a good experience on your site, then they’re more likely to come back. More likely to result in a conversion or a purchase, or whatever you’re looking to get out of your site. So that’s where I would focus the concerns.

    [00:12:34] Nathan Wrigley: If this were the Squarespace or Wix podcast, which of course it isn’t, it would be much more straightforward to have a conversation about why your site was quick because, you know, it’s this proprietary platform. There’s constraints about what you can do on that platform, and they run the whole thing, you know, they’ve got their arms around everything.

    WordPress, you download it from .org in most cases, and start to pile things on top of it. And very quickly we get the problems developing I guess, you know, the more things that you throw into it, the more plugins and what have you. Would your advice simply be circumspect about what you throw in, or can you, for want of a better phrase, can you concentrate on additional tech to mask over any problems that you have?

    You know, with the best one in the world, if you’ve got an LMS, it’s probably going to slow your website down because it’s doing a lot. If you’ve got WooCommerce, it’s probably going to slow yourself, the website, down from the vanilla install with using the 2025 theme that you just mentioned.

    But there’s this whole marketplace of hosting companies and performance companies who are selling you things that kind of undo the, and I’m doing air quotes, the damage that you did by putting the plugins in.

    So I don’t know if you’ve got anything to say to that. You know, the whole thing about bloating the website, slowing it down, unpicking it with different tech.

    [00:13:49] Weston Ruter: Yeah, well, the WordPress ecosystem has a problem with the kitchen sink issue and a plugin that has more features is somehow valued more highly than a plugin that does one thing and does it really well.

    And so in the Performance Lab plugin in our suite of plugins that we feature, we have the goal that a plugin should do one thing and do it really well. And if you don’t like what the plugin is doing, you deactivate it and switch to another one that is doing that one issue and doing it well.

    But if you have plugins that do so many things, then you’re really kind of, your hands are tied and it’s difficult to switch. And maybe that’s a strategy by some plugins to lock you in to their ecosystem, but it’s a difficult problem, yeah.

    [00:14:39] Nathan Wrigley: And we also have a, you know, we have plugins which are performance plugins. I mean, there’s dozens of them. I’m sure we could rattle off, whose job is to fix the problems that you may have created elsewhere in the website. If you’re in the weeds of it, like you are, you’ve probably got some vague understanding about it. You understand whether something is snake oil or not, but for the rest of us, that is a Pandora’s box, and there’s only chaos in there.

    I don’t know what will slow my website down. If I download, I’m going to use LMS again, if I download an LMS platform, I’m going to hope that the work has been done successfully. But I’m probably also going to be thinking about, okay, now do I need to talk to my host, get a different hosting environment, get it set up so it’s perfect for that? Do I need a performance plugin? Caching layers, putting things on the edge.

    And on and on it goes. It makes WordPress a difficult thing for many, many people to use. And so this idea of democratising publishing sort of goes out the window a little bit because it’s really extraordinarily hard to use.

    [00:15:34] Weston Ruter: Yeah. And I think that in addition to democratising publishing, WordPress should also be as part of that democratising performance. And again, making it so that users don’t have to worry about that.

    And what we’re doing in Core, we’re doing exactly that where as one of WordPress’s core philosophies is decisions, not options, and things should work out of the box.

    But when it comes to the ecosystem, it’s a open source environment and there’s no top down control over what a plugin does. So I think there’s opportunities with projects like the Plugin Check plugin to do more analysis on the performance, in addition to the security and the best practices for being accepted into the directory.

    But if there’s also a surfacing of performance issues or additional audits that are done on the impact of installing a plugin, that could be really valuable for site owners to get a sense of, this may cause problems if you install it.

    [00:16:37] Nathan Wrigley: How long has the Performance Team been a thing? I feel like three years or something like that, but I could be really wrong.

    [00:16:43] Weston Ruter: About four years I think.

    [00:16:45] Nathan Wrigley: Okay, yeah. And could you just run over the history of that? I was going to say organisation, but let’s go with team. Could you run us through the history of that team and what you’ve been able to do?

    Each of the little steps, some of them are quite profound. Some of them feel less profound, but very important. But over those four years, a lot of really incredible work has been done actually. Certainly from my perspective, it does seem that without that team we’d be in a very, very different place.

    [00:17:15] Weston Ruter: I hope that’s true. I think it is. Yeah, well, it started out focusing on, I think lazy loading of images was one of the first things to land through this team. And with that we also then uncovered that actually lazy loading everything, which while great for reducing the weight of a page, because you’re not downloading images that aren’t actually shown. If you lazy load images that are in the initial viewport, that actually hurts the Largest Contentful Paint metric because the browser wastes to start downloading those images until it knows that they’re in the viewport.

    So out of that came work to not lazy load images that are in the initial view port, and then also moving on to this attribute called fetch priority, which you can have the value of high, for example. So if you add fetch priority high to an image, then the browser’s going to prioritise loading that first. And so a lot of work was done to add sensible defaults in WordPress Core so that, for example, the featured image of a post gets fetch priority high, so that it gets loaded sooner over images that are not going to be the Largest Contentful Paint, most likely.

    So there’s that. And then there was also an issue with like emoji in posts where, on every page load there’s some JavaScript that runs in the head of the page, and it computes whether the browser supports the emoji, like all the emoji. And if the browser doesn’t support all the emoji, then it loads the Twitter emoji library to render them. And that JavaScript was causing a long task in lower performing browsers, or devices, that was hurting the largest contentful paint as well. So that was fixed as well.

    And then work has been done to add support for new image formats, like AVIF and WebP so that site owners can upload those image formats instead of JPEGs, which take longer to download.

    We talked about speculative loading, and you talked about that with Felix. So that landed in 6.8, which by default will start prefetching the HTML for a page when you mouse down or tap or click, pointer down on a link to give the browser a bit of a headstart. But then the API allows you to be more aggressive about starting that process, just when you hover over the link, for example, and then not just to prefetch the HTML, but to actually render the whole page.

    And so in my talk, which I gave earlier today, I showed the difference between no speculative loading, speculative loading as in WordPress Core right now, the default, and then moderate prefetch. And then lastly, moderate pre-render.

    [00:19:57] Nathan Wrigley: Is that done with the plugin? Well, I guess you could do that with code, but there’s an option to, if you download the plugin, you’ve got a UI for that as well.

    [00:20:04] Weston Ruter: Exactly. There’s a UI in the plugin that allows you to opt into moderate eagerness, or to use pre-render instead of prefetch. And in the example I showed, let’s say your time to first bite is a second. Then in the initial example, like on a slow, or on a fast 4G connection, you’re going to get like 2.27 seconds to load the page. But then with conservative prefetch, that shaves off like 50 milliseconds because the amount of time it takes to mouse down and mouse up is just a little bit of time that it can shave off that’s just a little bit to the loading of the page.

    But then when you go to moderate prefetch, then the browser can load the page fully in the background. And so then the time to first bite in that case becomes zero because the whole page is already in the browser’s cache. And that can reduce it to like one second because you totally eliminated the time to first bite.

    And then with the moderate pre rendering, then when you’re hovered over that link, the browser not only downloads the HTML, but also all the images, builds out the layout, runs the JavaScript. And so then when you click on that link, the page can load instantaneously.

    [00:21:12] Nathan Wrigley: So literally instantaneous.

    [00:21:14] Weston Ruter: 0.05 seconds.

    [00:21:16] Nathan Wrigley: Yeah. It’s instantaneous. I mean that’s pretty incredible. All of that is available inside of WordPress, but just to rewind, probably about 50 seconds, the default is not aggressive. The default in WordPress in order to satisfy the kind of 80 20 rule and what have you, the default is to make it so that there has to be some interaction. The mouse has to be invoked. There’s a click involved.

    That’s fascinating. So if you really want to get into the weeds of that, you can basically make the next page load almost instantaneously, should you wish to do that.

    One thing that I did get into with, I believe it was Adam Silverstein not that long ago when I had a podcast episode with him. And I don’t mean to go deeply into this, but there’s a curious balancing act here, I think with the environment and all of this speculative loading. Because it wouldn’t be desirable to load, I don’t know, there’s 12 navigation links and the mouse happens to go across all of them. And suddenly 12 unnecessary pages were entirely pre-rendered and what have you. So yeah. I don’t know if you’ve got any thoughts on that, whether there’s a balancing act between performance and environmental concerns.

    [00:22:23] Weston Ruter: Yeah. By default, speculative loading only operates on pages when you’re not logged in. And so when you’re not logged into WordPress, that is most of the time when you’re going to have a page cache that can serve it from the cache. And so as long as you have page caching in place, then the server isn’t going to be overly taxed by those requests.

    In the newest version of the Speculative Loading plugin, it has an opt in to speculative loading for logged in users as well. But there’s a warning that shows up if you don’t have a persistent object cache active, for example. So, yeah, it’s important to have good caching in place, good best practices for scaling.

    However, in addition to pre rendering, which the speculative loading plugin enables, there’s a much older technology for instant page loads that browsers all support, and that is the back forward cache.

    And WordPress sites, by default when you’re logged out, will benefit from this most of the time. But as soon as you login or if you’re navigating to like a shopping cart page, or an account page, or checkout page in an e-commerce site. Oftentimes the plugin will invoke this no cash headers function that tells the browser, primarily tells the page cache, hey, don’t hold onto this response because you don’t want to cache the shopping cart for one user and then serve it to another user, because then you would be seeing something embarrassing potentially.

    And so that is one of the benefits of sending that header. But it also has the effect of preventing the browser from holding onto that page as well. So if you navigate back and forward from the shopping cart, then you’ll notice that it doesn’t load very fast. It loads slow, because the browser has to re-fetch it all from the server, and has to rebuild everything from scratch.

    And so there’s a effort underway for 6.9 to stop doing that. To allow the browser to hold onto that in memory. And then to address, one of the issues that turned this off to begin with, allowing the browser to store the pages in the cache. Is if you aren’t logged in, for example, into WordPress. You’re on some sensitive page maybe putting some API key in or something, and you go to log out, with this back, forward cache, you could hit the back button to go back into the WordPress admin as another person, maybe on a shared computer and look at that page, even though the user had logged out.

    [00:24:50] Nathan Wrigley: Yeah, really not good.

    [00:24:51] Weston Ruter: Not good. So there’s a ticket for 6.9 which would solve that problem by invalidating those pages from bfcache so that that privacy concern isn’t there. And this issue is not just about, well, these back, forward navigations are very common. So the Chrome team found that one in 10 navigations on desktop are these back, forward navigations?

    [00:25:15] Nathan Wrigley: A tenth?

    [00:25:16] Weston Ruter: Yeah. And on mobile, I think it’s one in five. So 20% of the time on mobile, you’re going back and forward using a gesture instead of hitting a link.

    [00:25:25] Nathan Wrigley: That maps to my life, but I hadn’t thought about it.

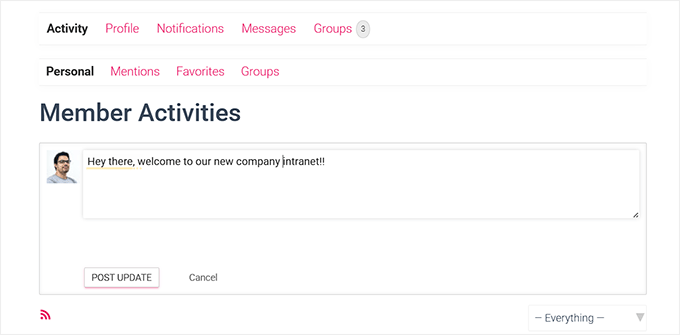
    [00:25:28] Weston Ruter: But the benefit here is not just in that you get a faster page load, but also bfcache, this back, forward cache will preserve the entire state of the page. So in my talk, I showed an example where you, if you have BuddyPress installed, you start typing in an update, a status update, and then you click away to a separate tab, and then if you hit the back button to go back to that initial tab, then you’ll find without this back, forward cache that your update’s gone because that input field was constructed with JavaScript. And when you don’t have back, forward cache, then the entire document object model has to be rebuilt. All the JavaScript has to re-execute. This is also an issue for the block editor. If you navigated away from a page and you didn’t save a draft, then everything gets lost without this back, forward cache.

    So back, forward cache not only improves performance, giving you the possibility of these instant page loads, but it also preserves that important state on a page that could be lost otherwise.

    [00:26:25] Nathan Wrigley: You have a plugin if memory serves, recently in the repo.

    [00:26:30] Weston Ruter: Yes. And I got some feedback that it’s a terrible name, which I agree.

    [00:26:32] Nathan Wrigley: What’s the name? I’ve forgotten.

    [00:26:33] Weston Ruter: It’s called no cache, bfcache.

    [00:26:36] Nathan Wrigley: That was it, yeah.

    [00:26:37] Weston Ruter: But if I were to rename it, which I probably will now, it would probably be called Instant Back Forward Navigations or something. It’s not so short, but.

    [00:26:43] Nathan Wrigley: So is the intention to take, are you spearheading that basically? is the intention to roll the learnings from that plugin into Core?

    [00:26:50] Weston Ruter: Yeah.

    [00:26:50] Nathan Wrigley: And I’m just going to read this into the record so that everybody understands. You are talking about backwards and forwards by using the buttons, which I guess typically live at the top left of a browser. Those buttons, the arrows that point backwards and forwards.

    [00:27:03] Weston Ruter: That’s right, or the navigation in like the gesture on Android to go back.

    [00:27:07] Nathan Wrigley: Yeah, so swipe typically and swipe right. okay. Yeah, that’s really interesting because I do that all the time. It really hadn’t occurred to me that was something that could be cached. And if, as you say it’s 20% on mobile, or 10% on, that’s a lot of time that you’re saving.

    Because you do, it’s a journey, isn’t it? And sometimes you get to a dead end, and so you just back three times, because you know that you wanted to go back to that product that you saw a minute ago, but you kind of got lost along the way. So that’s kind of almost like a roadmap item. That’s 6.9, hopefully. Are there any other things coming in 6.9 that are interesting?

    [00:27:39] Weston Ruter: Well, one of the new features in WordPress Core is this Interactivity API.

    [00:27:44] Nathan Wrigley: Oh, so nice.

    [00:27:46] Weston Ruter: And one of the great things about the Interactivity API is one of its key design principles is server side rendering. So let’s say you have a navigation block, or you have an image block with a lightbox. All of the HTML and the CSS needed to render those blocks are output on the server. There’s no need for JavaScript to construct the user interface.

    Nevertheless, there’s JavaScript needed because there’s interactivity involved in these interactive blocks. And so with each of these interactive blocks, there’s a script module that gets added to the page, and it’s added in the head of the page. And browsers download those script modules with a high priority. And the impact of that is, well, the browser doesn’t know that these aren’t important. It could be important, it could not be important.

    But by loading them with a high priority, they compete with loading of more important critical resources like the Largest Contentful Paint image, for example. So by having these modules in the head, then they cause the LCP metric to degrade. And so there’s a ticket to add fetch priority low to these script tags, which causes the browser to bump them down in priority so that the Largest Contentful Paint image has a chance to load sooner.

    [00:29:04] Nathan Wrigley: Yeah. It seems like a game of tennis, this whole thing. For example, the Interactivity API, what a fabulous thing that is, but smuggled into that with something, it sounds unexpected that nobody foresaw that one and okay, need to address that. And here we are, 6.9, that gets addressed.

    [00:29:21] Weston Ruter: Yeah, and one of the great things about the Interactivity API as well is that it has really pushed forward the new Script Modules API in WordPress, where what are also called ESM modules or scripts. And these are a new way of writing JavaScript and they are, by default they don’t block the rendering of the page.

    Whereas if you have a classic script like jQuery in the head of your page, as you start loading the page, the browser has to stop parsing the HTML, it has to fetch the JavaScript, it has to execute the JavaScript, and then because that JavaScript may be doing something like document.write, where it like adds HTML to the page as it’s executing. Then only after that’s all finished then the parser can continue and continue laying out the page. So it’s very bad for performance to have any external, or even inline sometimes, JavaScript in the head.

    And so one way to solve that issue is to slap a defer attribute on that script tag, or an async attribute, and that causes the script to then not block rendering, and it will be executed once the page has finished loading.

    And a nice feature of script modules is that they’re deferred by default. You can’t have a blocking script. And so the thinking was, oh, they don’t block rendering, so we can just put them in the head. But it turns out that they do impact the network, because there’s other things on the network than just the scripts. And we need to make sure that the critical resources are prioritised, like the LCP image and not just load everything with high priority.

    [00:30:55] Nathan Wrigley: It’s kind of curious because the past of WordPress has been about, you know, you click on links and you generate, I don’t know a post, a page or something, but you’ve got this static piece of content, largely. You know, there may be some JavaScript or something, which is doing something fun.

    But the interactivity, API suddenly presents a page which, I don’t know, you might be stuck on that page for quite a while doing other things. I don’t know how that leans into the whole performance thing. I don’t know we could search and filter a bunch of houses or real estate or what have you, and update things. And we are on this one URL but everything’s getting changed in front of our eyes. So I don’t know how that whole LCP thing gets bundled into that. It suddenly becomes a much more difficult problem to identify and solve, I guess.

    [00:31:35] Weston Ruter: Yeah. So with LCP, it is for that initial page load. So as soon as you interact with the page, then whatever is the largest element then going to be.

    [00:31:47] Nathan Wrigley: Oh, that ceases there does it?

    [00:31:48] Weston Ruter: Yeah, it stops at that point. However, there are other problems with performance that can arise after that Largest Contentful Paint. So one of the newer Core Web Vital metrics is the Interaction to Next Paint, and that is this INP value. And that is all about how much JavaScript is executing on the page. And JavaScript functions can do a lot of work, so much work that they cause the user interface to appear to halt.

    [00:32:19] Nathan Wrigley: Hang.

    [00:32:20] Weston Ruter: Yeah, hang. And so that’s called jank. And it can cause animations to stutter, it can cause a user interface to be sluggish, and you click a button and then nothing happens and then all of a sudden it opens up. And so that’s an example of a metric that is still very relevant with the Interactivity API. And there’s been work to establish best practices to make sure that the event handlers for these interactive blocks are using the best practices. Like, it’s called scheduler.yield, and it allows you to break up a long running task to give the browser a chance to catch its breath so that it doesn’t cause those long tasks.

    And then another important metric, which continues to matter even after the page is loaded is called the Cumulative Layout Shift or CLS. And that is a very common issue with, where you have ads or something that will just expand as you’re scrolling down and you lose your place in the page and that hurts your cumulative layout, that CLS score.

    [00:33:19] Nathan Wrigley: Yeah. You end up with your finger in entirely the wrong place just as you’re about to click on things.

    [00:33:23] Weston Ruter: That’s exactly right.

    [00:33:24] Nathan Wrigley: Old TechCrunch website. I don’t know if you’ve ever came across that one. That was a WordPress one, I believe. And I don’t know how many times I click entirely the wrong article because it just shifted just at the moment that my finger was descending.

    [00:33:33] Weston Ruter: Very aggravating yeah.

    [00:33:34] Nathan Wrigley: Yeah, really annoying. We’re really in the weeds here and what’s kind of fascinating, obviously you understand it all, I’m just holding on for dear life here. But it feels as if there’s a dance between what we’re expecting the browser to be able to do, and what it actually can do. And I don’t know if that’s the case.

    You know, I don’t know if the fact that I’ve got a shiny new Mac means that my experience of the web in the future will be better than my 8-year-old Mac over there. That never used to be something that I worried about. It took time to boot that machine, but once it was up and running, that machine was probably just as good at displaying the web as the shiny new one. But now it feels as if that’s maybe not the case.

    [00:34:13] Weston Ruter: It’s funny you say that because this emoji issue that I described earlier where it was causing this long task as the page was loading, I only discovered that as a problem because I was using a Chromebook as development device.

    [00:34:25] Nathan Wrigley: Yeah, notoriously low on specs.

    [00:34:27] Weston Ruter: Relatively, that one was even a fast one. But yes, much slower than one of the newer Macs. And so it’s important to always be testing in an average device, and not always just use the latest and greatest. Because you’re going to miss performance issues that are probably impacting a lot of users.

    And one of the issues with emojis is, going back to what I described earlier with this long script in the head, now there’s just an inline script, and even with an inline script, there is still a performance impact where it will stop, because the browser has to stop parsing the page, execute the JavaScript, and then keep going.

    And so I used my new Mac to analyse the performance of that and I didn’t see a problem. But then I tried the CPU throttling in Chrome Dev Tools where you can emulate low end, low tier device. And in that case, then all of a sudden I saw this 100 millisecond long task pop up, I can’t remember how long exactly, but it negatively impacted the LCP because it had to spend that time with this underpowered device.

    So, yeah, there’s many opportunities for optimising things that, if you’re using devices that people are actually using.

    [00:35:41] Nathan Wrigley: I don’t really know what the expectation is from WordPress over the next decade, but it doesn’t feel like it’s going to be limiting itself to websites. It feels like that’s a portion of it, but Matt Mullenweg often has talked about it being almost like the operating system for the web. Whether or not that will transpire, I don’t know.

    But certainly for me, a lot of the things that I used to associate with a downloaded app that would run on MacOS or Windows or what have you, I’m now fully expecting that to be in a browser. And so I expect that the same would be true of our websites. We’re going to be doing more with them. They’re going to be requiring more grunt in the background, you know, more interactivity, more filtering, more searching, more database queries. And yeah, I guess WordPress has got to try and keep up with all that.

    [00:36:29] Weston Ruter: In improving web performance, it’s a top down and a bottom up problem. Browsers are working to get faster. They’re competing with each other, trying to be as fast as possible for all the bragging rights, right? But oftentimes it’s impossible for the browser to know, even if it’s as smart as possible, what to prioritise when loading a page.

    So that’s why when I was working at Google, we were prioritising improving the web at scale through WordPress to implement best practices in how WordPress builds pages so that Chrome doesn’t have to figure out everything because it’s impossible for Chrome to figure that out from the top down.

    So if you look at the, over time these Core Vital Metrics, they all consistently are going up and improving, even if a CMS isn’t necessarily focused on a performance. They all are inching upward. And that’s because the browser is getting better at performance as well. But when a CMS like WordPress also invests in improving performance, then you can start to see it edging out other CMSs in terms of the relative improvement in performance.

    [00:37:35] Nathan Wrigley: Yeah, okay. Let me just parse that. So whether WordPress is at the top or the browser is at the top, you’ve got this top bottom thing, and it’s kind of inching in from the top, coming down. Maybe that’s the browser, and then WordPress at the bottom inching up, if they happily meet in the middle.

    So what you’re saying is that even if no performance work was done by a Performance Team in WordPress, there would have been in recent years a performance improvement, But the fact that there’s those two things in symphony with each other means that there’s a greater performance improvement.

    Given that WordPress, I don’t know what the number is right now, but the statistic of 43% was always banded around. So it’s a huge proportion of the internet. Does WordPress have a voice toward Mozilla and Chrome? Does it get to say what the future of browsers might look like? It feels like with that market share, It ought to have a big voice, but I don’t know if it does.

    [00:38:26] Weston Ruter: Well, I remember back when responsive images became a thing, and as I recall that it was WordPress implementing these responsive images that caused browsers to say, okay, we’re going to implement these now as well. So I think Chrome, I can’t remember which browser did at first, but it was kind of a catalyst that caused everything to get going.

    And similarly, recently with the speculative loading, it being adopted by WordPress has, I think, caused other browsers to say, okay, we’re going to implement this as well.

    And yeah, I know that when I was working at Google, and still I’m in contact with people at Google who work on web standards work, there are initiatives that they’re working on that they want feedback from WordPress developers to know like, is this going to work for WordPress? And if WordPress can leverage this, and going back and forth between what works for WordPress and what works for browsers and there’s ongoing conversations, yeah.

    [00:39:25] Nathan Wrigley: Yeah, it is kind of interesting. I was talking to somebody from Google, from the Site Kit team, they obviously put up quite a lot of money to be marquee sponsors, if you like. I don’t know what the word is, you know like a top tier sponsor often at these events. I don’t know if they’re sponsoring this one, but there does seem to be some interest from Google.

    I know that Mozilla doesn’t have the deep pocket, so we’re not really expecting that. But it’s nice to hear that, even if it’s kind of back channels, and it may not be that WordPress gets asked all the time, that there is some sort of symbiosis there. That’s nice to know.

    [00:39:55] Weston Ruter: Well, I remember also seeing recently that Site Kit was voted one of the most trusted WordPress plugins.

    [00:40:01] Nathan Wrigley: Yeah, 5 Million plus installs in under five years. And I was kind of surprised by that actually. when I did that interview, I didn’t realise the numbers were so big. And then after the interview I went out and asked a bunch of random people whether they’d used it, and a hundred percent of the random selection of 10 people that I asked used it on everything.

    [00:40:20] Weston Ruter: Yeah. I use it for sure.

    [00:40:22] Nathan Wrigley: Yeah, yeah. It’s kind of amazing. So just sort of rounding it off a little bit, I’m guessing that if you were to have your performance hat on, I could be wrong about this. You would be advising people to step away from the classic way of doing things in WordPress with, you know, the classic editor, the classic themes and things. I genuinely don’t know if there’s a performance improvement in full site editing, block-based themes, and what have you. Over to you really, it’s an open ended question.

    [00:40:46] Weston Ruter: Yeah, there definitely is a performance benefit to using block themes, and that is because the way that classic themes load, they load progressively where they will print out the head, head tag in the page and then before they render any of the template, they basically locked in the scripts and styles that the page is going to need even though that doesn’t actually know what’s going to be in the page for sure. It can make some guesses, but it doesn’t know for sure.

    And so for classic themes, you’ll have these massive style sheets that are printed in the head, you’ll have a whole bunch of scripts that you may or may not use. And as we said before, those scripts may be blocking the rendering and causing all kinds of problems in performance.

    But with block themes, the way that a template is rendered is completely different, where it actually will render all of the blocks in the content first before it goes about rendering the head, the links, the style sheets and the scripts that go in the head of the HTML. And so because of that, a block theme is able to selectively load just the styles and just the scripts that are relevant to the blocks on that specific page. And so the amount of CSS and JavaScript that’s on a page can be greatly reduced, which greatly improves performance.

    And also, one of the initiatives that we’ve been working on in the Core Performance Team is related to these responsive images that we were talking about. Where a responsive image, it has all of the different intermediate image sizes that are available. When you upload an image, it’ll reference all those different image sizes in the source set attribute. And then there’s the sizes attribute that says which of those intermediate image sizes should be loaded for that image in the page. But because WordPress doesn’t know classically, in the classic themes, how big an element is going to be, it uses by default the image that is the width of the view port.

    And so on a mobile device, that’s often fine because images are often the full width of the content. But on a desktop you often have a center column with margins on either side, and maybe the image is going to be in a column or floated to the right. And so oftentimes on desktop, you’re going to download a much larger image than is relevant to that container on the page.

    And so there’s a, one of the plugins in Performance Lab is called Enhanced Responsive Images. And what it does is it leverages the block structure in block themes to be able to figure out what the width is for the container of a given image. And then it can craft that sizes attribute to be much more accurate compared to the default sizes attribute. And in my talk, I showed that the performance gains from that enhancement alone are one of the largest that you can have, much more than just using AVIF or a modern image format.

    [00:43:51] Nathan Wrigley: Really?

    [00:43:51] Weston Ruter: Yeah because, for example, in my test page, I had a jpeg and then I tried it again with an AVIF and the AVIF was 20% smaller, so maybe I could compress it even further. But the Largest Contentful Paint improvement for that was only 2%. But with the Enhanced Responsive Images plugin active, it was able to use a much smaller image size, which is much fewer bites, even as a jpeg compared to the AVIF. And that improved the LCP by I think 45%. So a magnitude and a half higher.

    [00:44:28] Nathan Wrigley: It feels like this work is never, ever going to come to an end. There’s always going to be little things to tweak and squeeze out here, there and everywhere. And there was a really good example just there.

    I think somebody listening to this podcast, if they’ve got to this point, it’s kind of really fascinating that most of this stuff would go under the radar for most people.

    I’m sure almost everything that you’ve mentioned, for the casual WordPress user, they would never know that that happened. Not many people are going to read the change log or delve into the weeds of what the Performance Team are doing. And yet there it all is, laid out in front of us over the last 40 minutes or so. Yeah, absolutely loads and loads of work. and never ending. You’ll be here this time next with new things to say.

    [00:45:06] Weston Ruter: Hopefully. I don’t want to work myself out of a job.

    [00:45:07] Nathan Wrigley: That’s absolutely true. Where do you go to find information about this? You know, who are the scholars, or the YouTubers, or the blog post authors? Who are the people that are pushing the boundaries here?

    [00:45:20] Weston Ruter: Well, I have recently been loving the WordPress newsletters that go out, like the Repository and Remkus de Vries, his WP, I forget the name.

    [00:45:32] Nathan Wrigley: It’s okay.

    [00:45:33] Weston Ruter: It’s something in, WP in the name. I think, Within WP, but don’t quote me on that.

    [00:45:36] Nathan Wrigley: Oh, it is, Yeah Remkus, Within WP, you’re right.

    [00:45:39] Weston Ruter: Yes. So I subscribe to his performance blog. So Jono Alderson, Jono or Jono?

    [00:45:46] Nathan Wrigley: I think Jono. Yeah, we’ll go with that. And apologies if it’s not.

    [00:45:49] Weston Ruter: Yes. And so all of his posts are brilliant, so yeah. And then, yeah, following just the newsletters, because I don’t have time to keep up on social media anymore, but I really am thankful for those newsletters because it really saves me a lot of time. It gets me what I need to know.

    [00:46:05] Nathan Wrigley: Yeah, I will, link to the ones, the three that you’ve just mentioned.

    Yeah, that’s amazing. Thank you. Honestly, it seems a bit trite, but I’ve been following what the Performance Team have done for the last four years now, from the capacity that I have to understand it, which is pretty low in all honesty. You know, most of what you’re saying, I can get a purchase on the overarching idea, but as soon as you were to draw back, if you were to show me what you were doing, the code and so on, I would immediately lose my purchase.

    I’d just like to express how profoundly happy I am that people like you are taking the time to do it. I don’t know how much thanks you get for stuff like this, but for my part, thank you.

    [00:46:42] Weston Ruter: Well, thank you, but no thanks are required because I enjoy doing it, so.

    [00:46:45] Nathan Wrigley: Yeah, great. Well thank you. anyway.

    [00:46:46] Weston Ruter: I’ll do it anyway.

    [00:46:47] Nathan Wrigley: Yeah, well Weston Ruter thank you so much for chatting to me today. It’s been a pleasure.

    [00:46:51] Weston Ruter: Thank you very much.

    On the podcast today we have Weston Ruter.

    Weston Ruter is a long-time WordPress user and contributor. He has been a core committer for 10 years and he co-led the WordPress 4.9 release. He worked in the WordPress agency space and has also been sponsored to work on the Core Performance Team. He lives in Portland, which, as you will hear, was quite handy for this interview.

    We start the conversation by getting into the big picture: why website speed matters more now than ever, and how WordPress performs out of the box. Weston shares details about measuring true performance, revealing, for example, that achieving a perfect Lighthouse score isn’t the end game, and that real user experience metrics like Core Web Vitals and Largest Contentful Paint (LCP) should shape how developers and site owners think about optimisation.

    Throughout the episode, you’ll learn about the advances made by the WordPress Performance Team, from lazy loading and new image formats, to speculative loading that shaves precious milliseconds off page transitions. Weston explains how many performance improvements are designed to work automatically, democratising speed so even casual WordPress users benefit without needing to be technical experts. The conversation also touches on the balance between adding features and avoiding plugin bloat, the hidden impact of browser and device differences, and how large companies like Google are working hand-in-hand with WordPress to raise the bar on speed and usability.

    Weston offers practical tips, deep technical wisdom, and a glimpse of where WordPress performance is heading next, and it’s sure to inspire you to think differently about how your sites load, how your users engage, and how you can squeeze out every last drop of speed from the platform you love.

    Whether you’re a developer, designer, site owner, or just someone curious about what keeps the web running smoothly, this episode is for you.

    Useful links

    The Site Speed Frontier with Performance Lab and Beyond – Weston’s presentation at WordCamp US 2025

    A post about the presentation (above) on Weston’s own website

    Accelerated Mobile Pages (AMP)

    WordPress Core Performance Team

    Lighthouse

    Podcast – Felix Arntz on How Speculative Loading Is Speeding Up Your WordPress Website

    Performance Lab plugin

    CrUX – Chrome User Experience Report

    Largest Contentful Paint (LCP)

    Plugin Check (PCP)

    Optimize resource loading with the Fetch Priority API

    Podcast – Adam Silverstein Explores Transformative Browser Features Impacting WordPress Sites

    Back/forward cache

    Weston’s Instant Back/Forward plugin (mentioned in the podcast with an older name)

    Interactivity API Reference

    Script Modules API

    Interaction to Next Paint (INP)

    Introducing the scheduler.yield origin trial

    Cumulative Layout Shift (CLS)

    Site Kit plugin

    Enhanced Responsive Images plugin

    Within WordPress

    Jono Alderson’s website

    The Repository

  • I Built a Fundraising Thermometer in WordPress (in Just 10 Minutes)

    I Built a Fundraising Thermometer in WordPress (in Just 10 Minutes)

    Visitors decide whether or not to donate in seconds. If they can see that others are already contributing and the goal is within reach, they’re far more likely to take action.

    A fundraising thermometer can help with that. It turns your campaign into something people can see and connect with, generating excitement as the donation total moves closer to your target.

    I’ve tested several WordPress fundraising plugins that can add this feature, and a few make it incredibly easy. They update totals automatically and fit right into any donation form or landing page.

    In this guide, I’ll show you the quickest way to add a fundraising thermometer to your WordPress site so you can get more donations for your nonprofit.

    Add Fundraising Thermometers in WordPress in 5 Minutes

    💡Quick Answer: How to Add a Fundraising Thermometer in WordPress

    If you just want to find the solution quickly, here’s a simple rundown of your options:

    • Charitable plugin (Recommended): Ideal for nonprofits that want a full-featured donation system. Has built-in fundraising thermometers, donor tracking, and payment integrations.
    • Donation Thermometer plugin (Free): Great for a lightweight, standalone thermometer. Uses shortcodes, fully customizable, but you’ll need to update the amounts manually.
    • Formidable Forms (Advanced): Ideal for complex donation forms with fundraising thermometers. Includes a Charity Tracker template, supports multiple payment gateways, and lets you create multiple progress bars for your campaigns.

    This quick overview helps you decide which method fits your needs before diving into the step-by-step setup for each option.

    What Is a Fundraising Thermometer?

    A fundraising thermometer is a simple visual tool that shows how close you are to reaching your donation goal. It looks like a regular thermometer, and the bar fills up as more donations come in.

    It’s an easy and fun way to show supporters the progress of your campaign.

    For example, if your goal is $5,000 and you’ve raised $2,500, the thermometer will show that you’re halfway there.

    You can display a fundraising thermometer on your homepage, donation page, or in a campaign widget on the sidebar.

    Preview of a progress bar

    You can even add it directly inside your donation form so that donors see the progress while giving. Or you can show on a separate page on your website to encourage more donations.

    Depending on the plugin you use, it can also update automatically as donations are received, helping visitors see the progress in real time.

    How Does a Fundraising Thermometer Boost Donations?

    A fundraising thermometer isn’t just for improving your nonprofit web design — it actually helps you raise more money. I’ve seen this work on many nonprofit websites, and there are a few reasons why:

    • Goal Gradient Effect: People like to see progress. That’s why when a campaign gets close to its goal, supporters feel more motivated to give. I’ve noticed that donations often pick up speed once the bar passes 70% of the goal.
    • Social Proof: When visitors see other people donating, it builds trust. They think, “If others are giving, it must be worth it.” That’s social proof in action.
    • Instant Motivation: A thermometer gives donors quick motivation. Seeing the bar rise after each donation feels rewarding and encourages more people to help. In fact, studies show that visual progress indicators like fundraising thermometers can increase donations by 15–30%.

    Now, I’ll show you 3 effective ways to add fundraising thermometers in WordPress.

    You can use the links below to jump to the method of your choice:

    Method 1: Add a Fundraising Thermometer With Charitable (Best Overall Option for Nonprofits)

    If you’re looking for the best way to accept donations, run fundraising campaigns, and display a fundraising thermometer in WordPress, then I recommend using Charitable.

    It’s an all-in-one donation plugin made for nonprofits, and it comes with everything you need to create and track fundraising campaigns.

    Charitable Coupon

    Here are a few key features that make Charitable stand out:

    • Built-in progress tracking: See exactly how close you are to your goal.
    • Automatic updates: The thermometer fills up as donations are received.
    • Donor management tools: Keep track of all your donors in one place.
    • Automation options: Send thank-you emails, manage recurring donations, and more.

    With all these features, the tool saves you time while keeping your fundraising campaigns visually engaging. If you want more details, take a look at our complete Charitable review.

    Step 1: Install Charitable on Your WordPress Site

    First, you need to install and activate the free Charitable plugin. For details, just follow our tutorial on installing a WordPress plugin.

    Note: Charitable offers a free plan, which lets you add a fundraising thermometer (progress bar) to your donation forms.

    However, if you want access to more campaign templates, extra payment gateways, and advanced features like peer-to-peer fundraising, I recommend upgrading to the Pro version.

    If you choose the Pro plugin, then you will also need to enter your license key. To do this, head over to the Charitable » Settings page from the WordPress dashboard and paste it into the ‘License Key’ field.

    Add your Charitable license key in the field

    You can get this information from your account on the Charitable website.

    Step 2: Add a New Donation Campaign

    Now it’s time to create your first fundraising campaign. For this, go to the Charitable » Add New page from your WordPress dashboard.

    Start by giving your campaign a name. I suggest choosing something short and clear, like ‘Help Build Our Community Library’ or ‘Support Local Animal Rescue.’

    This name will appear on your donation form and campaign page, so make sure it’s something your visitors can easily recognize.

    Add a name for your fundraising form in Charitable

    Next, choose a campaign template. Charitable offers several pre-built options, and each one has a different layout and goal style.

    For example, you might see Animal Sanctuary, Disaster Relief, Medical Causes, or Environmental.

    To find out if a template already includes a built-in fundraising thermometer, simply click the ‘Preview’ button before selecting it. This helps you pick the design that fits your campaign best.

    But if your chosen template doesn’t include a thermometer, don’t worry. You can easily add one to any template using the drag-and-drop builder.

    Choose a template for your fundraising form in Charitable

    Once the Campaign Builder opens up, you’ll see a form preview on the right with form fields in the left column. Simply drag and drop these fields to rearrange, edit, or remove them.

    You can also add images, videos, and a short description to tell your story and inspire people to give.

    Plus, you can customize fields like donation amount, donor name, email, and payment options to fit your campaign. Everything is editable, so you can design the form exactly how you want.

    For more details, see our full tutorial on how to create a recurring donation form in WordPress. It explains how to add advanced fields and options to make your forms more flexible.

    Customize your donation form in Charitable
    Step 3: Add and Customize Your Fundraising Thermometer

    Charitable makes it super easy to add a fundraising thermometer to any of your donation forms. It comes with a built-in Progress Bar field that you can drag and drop into the form preview.

    You can place it anywhere you want — at the top of the form (great for visibility), just above the donate button (to motivate donors before giving), or at the bottom (to wrap up the form with a sense of progress).

    Add the progress bar field in the donation form in Charitable

    Once you add the Progress Bar field, click on it to open its settings in the left column.

    Here, you can start by adding a headline for your fundraising thermometer. This text appears right above your progress bar, so use something clear like ‘Our Goal So Far’ or ‘Help Us Reach $5,000.’

    This helps donors immediately understand what the bar represents.

    Next, toggle on the switches for ‘Show Donated’ and ‘Show Goal.’ These options display your total raised amount and your overall goal.

    If you leave one turned off, then the progress bar will still work, but it won’t feel as complete. For example, you can hide the goal if you want to keep the number private.

    But I recommend keeping both switches on so donors can clearly see how close you are to reaching your target.

    Configure headline and campaign information for the fundraising thermometer in Charitable

    After that, scroll down to the ‘Goal Label’ field. This is the text that appears beside your fundraising thermometer to show donors what you’re aiming to achieve.

    For example, you might write Goal: or Our Target: — the actual goal amount (like $5,000) will appear automatically next to this label once you’ve set it up later in the settings.

    Below that, you’ll see the ‘Donate Label’ field. This text appears next to the amount your campaign has already raised. You can customize it to say something like Raised so far: or Donations collected: depending on your tone or style.

    The amount next to this label will update automatically every time a donation is received, so you don’t need to edit it manually.

    You can also adjust the width and alignment options to make sure your fundraising thermometer fits seamlessly into your form’s layout.

    Set Goal Label for fundraising thermometer in Charitable

    Finally, switch to the ‘Advanced’ tab at the top to customize the look of your thermometer.

    Here, you can choose the style, size, and theme colors to match your website’s design or campaign branding.

    Configure progress bar colors in Charitable
    Step 4: Set a Goal for Your Fundraising Thermometer

    Now that your thermometer has been added to your donation form, it’s time to set your fundraising goal and configure other important campaign settings.

    Switch to the Settings » General Settings tab from the left column. Here, you can set your fundraising goal in the ‘Goal’ field.

    This sets the target your thermometer will measure against. It updates automatically as donations come in, so donors see real-time progress.

    I also suggest setting an end date for your campaign. Adding a clear deadline helps create a sense of urgency because people are more likely to donate when they know time is running out.

    Set a goal for your fundraising thermometer in Charitable

    Next, go to the Marketing tab to connect your campaign with your favorite email marketing service like Constant Contact or Drip.

    This lets you automatically follow up with donors, send thank-you emails, or share updates about your campaign’s progress.

    💡 Pro Tip: Make sure your email notifications reach donors’ inboxes by setting up WP Mail SMTP. It improves email deliverability so that your confirmation emails, receipts, and updates don’t end up in spam.

    To get started, see our tutorial on how to configure your email settings properly.

    Connect donation form to email marketing service in Charitable

    Finally, switch to the Payments tab to connect your preferred payment gateways — such as Stripe, PayPal, or Braintree. Once connected, donors can securely give on your website through your donation form.

    For step-by-step instructions, check out our guide on how to accept international donations in WordPress.

    Connect the donation form to Stripe in Charitable
    Step 5: Launch Your Fundraiser Campaign

    Once your campaign looks good, it’s time to make it live.

    To do this, switch the form to ‘Publish’ and click the ‘Save’ button to store your changes.

    Make your fundraising campaign live in Charitable

    After that, you can embed your fundraising form anywhere using the Charitable block in the block editor.

    Just open any page or post, add the ‘Charitable Campaign’ block, and select your campaign from the dropdown.

    Add Charitable campaign block to a page

    When you’re done, click the ‘Update’ or ‘Publish’ button to save your settings.

    Here’s a quick preview of how your fundraising thermometer might look on your site:

    Preview of a fundraising thermometer in Charitable
    Step 6: Manage and Track Your Fundraising Thermometer

    You can also easily monitor your campaign’s performance right from your WordPress dashboard.

    Just go to Charitable » Donations, where you’ll see each campaign listed along with its fundraising thermometer showing real-time progress.

    View the Campaigns page in Charitable

    You can also visit the Reports page to get a detailed overview of your fundraiser’s performance after adding the thermometer.

    Here, you’ll find charts and key stats like total donations, total donors, average donation amount, and more — giving you a clear picture of how your campaign is doing.

    View the Reports page in Charitable

    If you ever need to make changes, you can update your fundraising goal or extend the campaign’s end date from the campaign settings.

    This flexibility helps you keep the momentum going and adjust your targets as your fundraiser grows.

    Method 2: Add a Fundraising Thermometer With the Donation Thermometer Plugin (Best Free Option)

    If you just want a quick and free way to show your fundraising progress, then the Donation Thermometer plugin is a great pick.

    It’s lightweight, super easy to use, and won’t slow down your site. Just note that you’ll need to manually update the amount raised as your donations come in.

    I recommend this method for small community fundraisers, school projects, or personal charity drives that don’t require features like donor tracking or payment integrations.

    Step 1: Install and Activate the Donation Thermometer Plugin

    You can start by installing and activating the Donation Thermometer plugin.

    To do this, head over to the Plugins » Add New page and search for ‘Donation Thermometer.’

    Install and activate the Donation Thermometer plugin

    For detailed instructions, you can also see our guide on how to install a WordPress plugin.

    Step 2: Set Your Fundraising Targets

    Upon plugin activation, go to the Settings » Thermometer page from your WordPress dashboard. Here, you will set up the goal for your fundraising thermometer.

    In the ‘Thermometer Values’ section, start by entering your ‘Target Value’. This is the total amount you want to raise for your campaign (for example, 50000).

    Next, enter your ‘Raised Value’, which shows how much has already been collected (for example, 25000). If you haven’t raised any money yet, you can leave this field blank for now.

    Add target and raised value for your fundraising thermometer

    Just keep in mind that this plugin does not update the raised amount automatically.

    Each time you receive a donation, you will need to return to the settings page. Then, manually update the ‘Raised Value’ field to reflect your current progress.

    Step 3: Customize the Appearance of Your Fundraising Thermometer

    After setting your fundraising goal and raised amount, it’s time to adjust a few key settings that make your thermometer easy to read and visually appealing.

    Start with the thermometer orientation.

    You can choose portrait (vertical) or landscape (horizontal), but portrait usually looks best and feels familiar to most visitors.

    Configure your fundraising thermometer orientation

    Next, make sure to show the percentage, target, and amount raised by selecting ‘True’ from the dropdown menu.

    The percentage gives donors a quick visual look at how close you are to your goal, while the target and raised amounts provide transparency and help build trust.

    Show your percentage in the fundraising thermometer

    After that, pick a fill color for the thermometer so it stands out on your page.

    You can also add a second fill color if you want a subtle gradient effect.

    Customize colors for your fundraising thermometer

    Finally, adjust the number formatting to keep your amounts clean and easy to read.

    This includes setting your currency symbol (like $), choosing a thousands separator (, is easiest to read), and setting decimal places (usually 0 for whole numbers).

    Configure currency value for your fundraising thermometer

    These simple adjustments are enough to create a professional-looking thermometer that clearly communicates your fundraising progress. But I recommend taking a look at the other settings and customizing them to your liking.

    Once you’re happy with everything, click the ‘Save Changes’ button to store your settings.

    Step 4: Add the Thermometer to Your Site

    Now it’s time to put your fundraising thermometer where your visitors can see it. Since this plugin only displays a thermometer and doesn’t include a donation form, I recommend adding it to your sidebar for maximum engagement.

    Sidebars are visible on almost every page, so visitors can easily track your progress while browsing your site.

    To do this, go to the Appearance » Widgets from your WordPress dashboard. Once there, expand the Sidebar section, and add the ‘Shortcode’ block from the menu on the left.

    Then, paste the following shortcode to display your thermometer.

    [thermometer]
    
    Add the shortcode to display your fundraising thermometer

    After that, click the ‘Update’ button to store your settings.

    This is how your fundraising thermometer will appear on your website.

    Preview of a simple fundraising thermometer

    Keep in mind that if you’re using a block theme, the classic Widgets menu won’t appear in your dashboard. In that case, head over to Appearance » Editor and open your Homepage template.

    This will open the Full Site Editor on your screen. Here, click the + icon to open the block menu, and drag and drop the ‘Shortcode’ block wherever you want your thermometer to appear.

    Add fundraising thermometer shortcode in the FSE

    Paste the following shortcode into the block and click ‘Save’ at the top.

    [thermometer]
    

    Now, you can visit your site to see how your fundraising thermometer looks.

    Fundraising thermometer preview in a block theme

    Method 3: Add Fundraising Thermometer Using Formidable Forms (Best for Complex & Customizable Donation Forms)

    If you’re looking to create more complex and customizable donation forms with fundraising thermometers, then Formidable Forms is the way to go.

    It is an advanced form builder that lets you create all kinds of forms — from donation forms to event registrations, nonprofit signups, and much more.

    It even comes with a Charity Tracker template, making it quick and easy to set up a fundraising thermometer while giving you full control over customization.

    Formidable Forms

    The only reason Formidable Forms is my third choice is that, unlike dedicated donation plugins, it isn’t solely focused on fundraising. If your main goal is just a donation form, it might be overkill.

    However, it’s the perfect choice if you also need other complex forms, like volunteer applications or event sign-ups, or if you want to display fundraising data in advanced ways.

    To learn more about its features, take a look at our detailed Formidable Forms review.

    Step 1: Install And Activate Formidable Forms

    First, you will need to sign up for Formidable Forms (Business plan or higher). This unlocks advanced features, such as the Visual Views addon and application templates, which you’ll need to show your fundraising thermometer.

    Once you’ve signed up for an account, you need to go to your WordPress dashboard. Here, you must install and activate the free Formidable Forms Lite plugin. This free version is required as the base plugin for everything to work.

    For a full walkthrough, check out our tutorial on how to install a WordPress plugin.

    Then, go to the Formidable » Global Settings page and enter your license key. You can find this information in your Formidable Forms account on their website.

    Add the license key in Formidable Forms

    Next, head to the Formidable » Add-Ons screen in your WordPress dashboard. Here, you need to find the ‘Visual Views’ addon and switch the toggle to activate it.

    This add-on is the key to displaying your donations in a beautiful fundraising thermometer. It takes the form data — including each donation — and shows it as a progress bar that updates automatically.

    Install the Visual Views addon in Formidable Forms

    With Visual Views, you can fully customize how your thermometer looks and where it appears on your site, giving you both functionality and flexibility for your fundraiser.

    Step 2: Add and Configure a Payment Gateway

    Since you’re already in the Add-Ons section, I also recommend installing your preferred payment add-on.

    This step is important because I’m going to show you how to create a donation form that comes with a built-in payment field. Connecting a payment gateway ensures that people can actually donate through the form.

    Formidable Forms supports popular options like Stripe and PayPal, so you can choose what works best for your nonprofit or fundraiser.

    For most users, Stripe is the easiest choice. It handles multiple payment types, like credit and debit cards, Apple Pay, and Google Pay, and keeps donations secure.

    Install the Stripe addon in Formidable Forms

    After activating the add-on, navigate to the Formidable » Global Settings » Payments page from the dashboard and click the ‘Connect to Stripe’ button.

    You can now link your account to Formidable Forms.

    Click the Connect to Stripe button in Formidable Forms

    Once completed, you’ll be redirected back to WordPress, and a green checkmark will confirm that your Stripe account is connected successfully.

    Now, donations collected through your charity template will update your fundraising thermometer automatically.

    Step 3: Use the Charity Tracker Template

    Now, it’s time to install the Formidable Forms Charity Tracker Application Template. I’ve tried this template with a few demo campaigns, and it really cuts down on setup time.

    It automatically creates all the components you need to start fundraising quickly:

    • Donation and charity forms – to collect donor information and track donations.
    • Thermometer, circle, and horizontal progress bar views – to visually display fundraising progress.
    • Pre-built pages for donations and progress tracking – ready to publish or customize.

    To get started, go to the Formidable » Applications page and find the ‘Charity Tracker’ template.

    Add the Charity Tracker application in Formidable Forms

    Here, click the ‘Add’ button.

    This will open a popup, where you’ll need to click ‘Install Application.’

    Click the Install Application button in Formidable Forms

    Once you do that, another popup will appear asking you to name your application.

    You can use any name that helps you recognize your campaign later if you ever want to edit or delete it. After that, click the ‘Install Application’ button again to confirm.

    Add a name for your application in Formidable Forms

    Formidable Forms will now create your full charity tracking setup, which includes:

    • Charity Details Form
    • Charity Donation Form
    • Charity Donation Horizontal Progress Bar
    • Charity Donation Circle Progress Bar
    • Charity Donation Thermometer Progress Bar
    • Charity Donation Submission Page
    • Charity Progress Trackers Page

    Each of these components is already linked and ready to use. From here, simply click the ‘Open Application’ button.

    Click the Open Application button in Formidable Forms

    This will take you inside your newly created application, where you can see your forms, pages, and progress bar views.

    Step 4: Set Your Charity and Fundraising Goal

    Now that your template is set up, it’s time to configure the forms that power your fundraising thermometer.

    I recommend starting with the Charity Details form since this is where you’ll define your campaign’s name and fundraising goal.

    To do that, go to the Formidable » Entries page. You’ll see both the Charity Details and Charity Donation forms already created for you.

    Here, click ‘Edit’ under the Charity Details form to open it.

    Click Edit link under Charity Details in Formidable Forms

    This will take you to a new screen where you can enter a Charity Name — for example, the name of your cause or campaign — and set your Charity Goal, which is the total amount you want to raise.

    Keep in mind that this form is for internal use only. Visitors won’t see it, so it’s just for you or your team to manage and update.

    Once you’ve entered your details, click the ‘Update’ button to save your settings.

    Configure charity goal in Formidable Forms

    Next, you’ll need to check the entry for the Charity Donation form. On this same page, click the ‘Edit’ link under the ‘Charity Donation’ form.

    Here, make sure that the ‘Status’ field is set to ‘Approved’ from the dropdown menu.

    This ensures that test or pending donations will appear correctly on your fundraising thermometer once they come in.

    You don’t need to adjust any other settings in this form because it’s already set up to work with the Charity Tracker template.

    Configure entry status as approved in Formidable Forms

    Next, go back to the Formidable » Applications page. Now it’s time to customize your Charity Donation Thermometer Progress Bar.

    Formidable gives you three styles to choose from: a thermometer, a horizontal bar, or a circle progress bar.

    I prefer the thermometer view because it’s visually engaging and instantly communicates progress toward your goal.

    Click the ‘Edit’ link under the Charity Donation Thermometer Progress Bar.

    Click the Edit link under Donation Thermometer Progress Bar

    This will open the Formidable Views builder, where you can adjust the thermometer’s appearance.

    From the left-hand panel, you can customize its typography, background color, border radius, padding, and more to match your site’s branding.

    The best part? The thermometer is already linked to your donation form — so you don’t need to manually connect it or configure any extra settings.

    Customize the fundraising thermometer in Formidable Forms

    Once you’re happy with how it looks, click the ‘Update’ button at the top to save your changes.

    Step 5: Display Your Donation Form and Thermometer

    Now it’s time to display your donation form and fundraising thermometer on your website.

    To do this, go to the Formidable » Applications page and click the ‘Edit’ link under Charity Donation Submission.

    Edit charity donation submission page in Formidable Forms

    This will open the block editor, where you’ll see that your donation form has already been added automatically.

    Next, open the block menu from the left column and search for the ‘Formidable Views’ block. Drag and drop it into your page.

    Donation form already added by default

    Once it’s added, use the dropdown inside the block to select the fundraising thermometer you created earlier.

    When you’re happy with the layout, click the ‘Publish’ button at the top to save your changes.

    Add Formidable Views block

    That’s it — your donation form and fundraising thermometer are now live on your site.

    I recommend visiting your WordPress site to preview the page and make sure everything looks the way you want.

    You should see both the donation form and the fundraising thermometer displayed on the same page, updating automatically as new donations come in.

    Fundraising thermometers in Formidable Forms

    💡Bonus Tips to Boost Your Donations in WordPress

    Now that your fundraising thermometer is live, donors can see your progress in real time.

    However, there are a few more things you can do to encourage even more donations. I’ve found these tips really help make fundraising campaigns more effective:

    • Enable Recurring Donations: Encourage donors to give automatically each month to create a consistent revenue stream.
    • Activate Fee Recovery Options: Allow donors to cover transaction fees so that your nonprofit keeps the full donation amount.
    • Create Urgency with Campaign Deadlines: Use clear end dates or countdowns to motivate faster donations as the goal approaches.
    • Use Peer-to-Peer Fundraising: Encourage supporters to create their own mini-campaigns and share them with friends and family to expand your reach.

    These tips can help you make the most of your fundraising efforts.

    Frequently Asked Questions About Adding Fundraising Thermometers in WordPress

    Adding a fundraising thermometer to your site is pretty straightforward, but I’ve been asked a few questions about how they work and what you can do with them.

    Here are some quick FAQs to clear things up.

    Does a fundraising progress bar update automatically when donations are received?

    Yes! Most WordPress fundraising plugins, including Charitable and Formidable Forms, automatically update the thermometer in real time whenever a donation is made. This means your donors always see the current progress.

    However, if you use a simpler tool like the Donation Thermometer plugin, you will need to update the amount manually.

    Can I have multiple fundraising thermometers for different campaigns?

    Absolutely. You can create as many thermometers as you need for different campaigns, each with its own goal, style, and placement on your site.

    What payment methods does Charitable support?

    Charitable integrates with popular payment gateways like Stripe and PayPal, making it easy to securely accept donations directly on your site.

    Can I track offline donations in my fundraising thermometer?

    Yes. You can manually add offline donations so that your thermometer accurately reflects all contributions, not just online ones.

    Is there a limit to how many fundraising campaigns I can create with Charitable?

    No. You can run multiple campaigns simultaneously, allowing you to manage and track different fundraising goals at the same time.

    I hope this article helped you learn how to easily create a fundraising thermometer in WordPress. You may also want to see our guide on adding a PayPal donate button in WordPress or our tutorial on creating a donor portal in WordPress.

    If you liked this article, then please subscribe to our YouTube Channel for WordPress video tutorials. You can also find us on Twitter and Facebook.

    The post I Built a Fundraising Thermometer in WordPress (in Just 10 Minutes) first appeared on WPBeginner.

  • Matt: D’Angelo & Diane

    Just last night I was re-watching Annie Hall to remember and honor Diane Keaton, and now the news that D’Angelo had passed. I’m writing this listening to Voodoo, one of the great albums of all time. That CD in my beater car in Houston was on constant rotation, the richness of the tracks— it’s an album you have to listen to in its entirety, it takes you on a journey, the way the tracks blend in to each other. Not ideal for the atomized world of songs being stand-alone.

    D’Angelo was obviously a star, but one amazing thing about his bands is he brought so many people with him, so many amazing jazz musicians, including Roy Hargrove, Robert Glasper (HSPVA!), Chris Dave (HSPVA!), Kenny Garrett, Pino Palladino, Questlove… May his memory be a blessing.

  • Open Channels FM: Why Focus Matters When Building a Successful WordPress Plugin Business

    Learn the importance of focus in scaling a WordPress plugin, advocating for prioritizing core products over numerous side projects to achieve long-term success.

  • Open Channels FM: How Great Storytelling Builds Brand Loyalty and Differentiates Products

    In this episode, Rae and Adam dig into why storytelling is key for brands to shine in WordPress, sharing tips on connection, differentiation, and authentic messaging.

  • Matt: Nanochat & MCP

    Probably the most interesting thing on the internet today is Andrej Karpathy’s nanochat, “a minimal, from scratch, full-stack training/inference pipeline of a simple ChatGPT clone in a single, dependency-minimal codebase.” 8,000 lines of beautiful code, as Simon Willison notes. If you want to understand how LLMs work, study this. Andrej is a code poet.

    In hacking news, Wired has an amazing article on intercepting geostationary satellite signals.

    On Friday, we turned on something cool: every WordPress.com site now supports MCP. Right now this is read-only access to your site, because the S in MCP stands for Security, but you can already start to do some cool stuff with it.

  • How I Turned My WordPress.org Reviews Into Powerful Social Proof

    How I Turned My WordPress.org Reviews Into Powerful Social Proof

    While developing my own WordPress plugins, I realized that earning people’s trust was often harder than building the product itself. You can have great features and reliable support, but if someone hasn’t heard of you before, they will still hesitate to click “Install” or “Buy.”

    That’s why I recommend showing real WordPress.org reviews and ratings directly on your own website. Seeing authentic feedback from existing users can help new visitors feel confident about choosing your plugin or theme.

    It’s a simple addition that can instantly boost credibility and conversions.

    In this guide, I’ll show you how to display live WordPress.org plugin and theme reviews on your site — no coding required.

    Show WordPress.org Plugin and Theme Reviews

    TL;DR: Use Smash Balloon Reviews Feed Pro to embed WordPress.org plugin and theme reviews directly into your WordPress website.

    Why Embed WordPress.org Reviews on Your WordPress Website?

    Showing your WordPress.org reviews on your website is one of the easiest ways to get more installs and sales for your plugin or theme.

    People trust what other users say more than any marketing message. So, when visitors see real ratings and feedback from WordPress.org right on your site, it reassures them that your product is legitimate.

    Plus, they don’t have to leave your website to check the reviews because the proof is right there. That means visitors stay longer on your site, which can lead to more pageviews and engagement.

    Here are other ways that embedding WordPress.org reviews can help you:

    • Builds instant trust — Real reviews show that others already use and love your product. This can convince them to click “Install” or “Buy”.
    • Highlights your strengths — Reviews often mention ease of use, support quality, or performance (things that persuade new users).
    • Keeps social proof fresh — Reviews update automatically, showing visitors your product is active and reliable.

    Now, I’ll walk you through how to show WordPress.org plugin and theme reviews on your site.

    Here’s everything I’ll cover in this guide:

    Step 1: Install and Activate Smash Balloon’s Reviews Feed Pro

    For this tutorial, I’ll use the Smash Balloon Reviews Feed plugin. This is the best WordPress product review plugin because it lets you easily display reviews from lots of different sites, like WordPress.org, right on your own website.

    At WPBeginner, our team has extensively tested the plugin’s entire feature set. You can see our full results in our in-depth Smash Balloon review.

    First, you’ll need to sign up for Reviews Feed Pro from the Smash Balloon website. Just click on the ‘Get Started’ button and follow the signup process to create an account.

    The Smash Balloon Reviews Feed Pro WordPress plugin

    💡 Note: You’ll need the Smash Balloon Reviews Feed‘s Elite plan or the All Access Bundle to embed WordPress.org reviews. This is because connecting to specialized sources like WordPress.org requires the plugin’s more advanced features.

    Once you’ve purchased a license, go ahead and copy your Elite license key from your Smash Balloon account dashboard or the email you received when you signed up.

    Then, let’s head to Plugins » Add New Plugin from your WordPress admin area to install the free Smash Balloon Reviews Feed plugin. We’ll start by installing the free version of the plugin, and then use your license key to unlock the pro features.

    The Add New Plugin submenu under Plugins in the WordPress admin area

    On the next screen, you can use the search feature to quickly find Smash Balloon Reviews Feed.

    In the search results, click ‘Install Now’ and then ‘Activate.’ If you need help, you can see our complete guide on how to install a WordPress plugin.

    Installing the Reviews Feed plugin

    After activation, you’ll see a new ‘Reviews Feed’ menu item in your WordPress admin.

    In the ‘Settings’ section, simply enter your license key and click ‘Install Pro’ to unlock all the Reviews Feed Pro premium features.

    Verifying the Reviews Feed Pro plugin's license key

    Step 2: Create a New Review Feed

    Now it’s time to set up your first review feed.

    Navigate to Reviews Feed » All Feeds in your WordPress dashboard and click the ‘Add New’ button. This will open the feed creation wizard, which will guide you through connecting to WordPress.org.

    Creating a reviews feed on your WordPress website

    From here, you can see that the plugin supports multiple review platforms, including Google, Facebook, and Yelp. But for this tutorial, I’m focusing specifically on WordPress.org plugin and theme reviews.

    So, from the list of available review sources, let’s select ‘WordPress.org’ and click ‘Next’.

    Choosing WordPress.org as the review source

    The setup wizard will now prepare to connect your feed to WordPress.org’s review system.

    This connection allows the plugin to automatically pull in fresh reviews from any WordPress.org plugin or theme page that you specify.

    Step 3: Add Your WordPress.org Plugin or Theme as a Source

    To connect your review feed to specific WordPress.org reviews, you’ll need to provide the URL of the plugin or theme with the reviews you want to display.

    You can open a new browser tab and navigate to the WordPress.org page for your chosen plugin or theme.

    Let’s say you want to show reviews for a contact form plugin.

    Simply go to that plugin’s official WordPress.org page and copy the complete URL from your browser’s address bar.

    For example, the correct URL for the WPForms plugin is https://wordpress.org/plugins/wpforms-lite/.

    Make sure you copy the link from the main page, not from the reviews or support tabs.

    Copying a plugin's WordPress.org URL

    This specific web address is like a map pointer, telling the plugin exactly where to find the right reviews for your product.

    You can now return to your WordPress dashboard, paste the URL into the ‘Page URL’ field, and then click ‘Finish’.

    Entering the plugins' URL into the Page URL field

    🧑‍💻 Pro Tip: The process works exactly the same whether you’re displaying plugin or theme reviews. Just make sure you’re copying the URL from the correct WordPress.org page.

    Once connected, Reviews Feed Pro will automatically sync with WordPress.org to pull in the latest reviews for your chosen plugin or theme.

    This ensures your displayed reviews stay current without any manual updates needed.

    WordPress.org link added

    From here, just click ‘Next’ to start customizing your reviews feed.

    Step 4: Customize Your Reviews Feed

    Reviews Feed Pro automatically generates a feed that matches your website’s existing design, but you can customize it to fit your needs.

    You can start by selecting from the available pre-built templates. These templates provide different layouts and styling options that work well with most WordPress themes.

    After that, click ‘Next’ to continue.

    Choosing WordPress.org reviews feed template

    On the next screen, you’ll see the visual customizer, where you can adjust your feed’s appearance.

    Here, you can modify the header section, button styles, and individual review elements like star ratings and user avatars. Every change you make appears instantly in the live preview panel on the right side of your screen.

    Reviews Feed Pro editor for WordPress org reviews

    For example, if you go to the ‘Layout’ section, you can choose between 3 main layout styles:

    • List – Reviews stacked vertically
    • Masonry – Pinterest-style grid
    • Carousel – Sliding reviews

    Don’t worry if you’re not sure which one to choose, because you can see how it looks in the preview.

    WordPress org reviews layout

    Next, one of my favorite features is the filtering system in the ‘Settings’ tab.

    It lets you filter reviews by star rating to show only 4-5 star reviews, or use keyword filtering to display reviews that mention specific terms. There’s even a banned words filter to exclude reviews containing specific phrases.

    Reviews Feed's filtering options

    For complete control, you can manually moderate which reviews appear on your WordPress site.

    This is especially helpful if you want to curate the most relevant and helpful reviews for your audience. For instance, you can use it to highlight reviews that discuss a specific feature you want to promote or mention your excellent customer support.

    Enabling reviews moderation in Reviews Feed Pro

    Step 5: Display the Reviews on Your Website

    When you’re satisfied with your feed’s appearance, click the ‘Embed’ button in the top-right corner of the customizer.

    This opens your embedding options.

    The Embed button in Reviews Feed Pro

    You have three ways to display your reviews:

    • Add to a Page lets you embed reviews directly into any existing post or page. This is perfect for product pages or detailed plugin reviews.
    • Add to a Widget allows you to show reviews in your sidebar, footer, or any other widget area. This works well for displaying testimonials site-wide.
    • Copy Shortcode gives you a shortcode that you can paste anywhere on your site. This option provides the most flexibility for custom placements.

    For this example, let’s add reviews to a page – choose ‘Add to a Page.’

    Choosing the Add to a Page option on the Embed Feed popup

    Then, you’ll select the page where you want the reviews to appear

    Your home page is a good start. It can use a simple list of positive reviews to create a strong first impression of trust and reliability.

    So, let’s select the home page from the list and click the ‘Add’ button.

    Adding reviews to the home page

    Next, in the content editor, you can click the ‘+’ button to add the Reviews Feed block.

    Go ahead and use the search bar to quickly find the block.

    Adding Reviews Feed block

    Once you add the Reviews Feed block, you’ll immediately see the preview in the editor.

    From here, you can move around this block to any position on your page using the standard WordPress block editor controls.

    Reviews Feed added to the content editor

    When you’re happy with everything, hit ‘Save’ or ‘Update’ to publish your page.

    Your WordPress.org reviews are now live and will automatically update as new reviews are posted to the original plugin or theme page.

    WordPres org reviews on a live site

    How to Maximize Conversions From WordPress.org Reviews

    Displaying your WordPress.org reviews in the right place can make a big difference in how many people install or buy your plugin or theme.

    Here are some of the best places you can add your WordPress.org plugin or theme reviews:

    • 💰 Sales and product pages: Placing glowing reviews right next to your ‘Buy Now’ button can be the final nudge a potential customer needs. It helps justify the price by showing that other happy customers have already chosen your product.
    • 🧩 Landing pages: When someone visits a page about a specific plugin or theme, showing reviews right away builds instant trust and helps turn interest into action.
    • 🛒 Checkout pages: Even a small reviews widget with 4–5 star reviews can calm last-minute doubts and reduce cart abandonment.

    I’ve found that pages with well-placed reviews convert better. The key is to show the right reviews on the right pages, based on what your visitors are looking for and where they are in the buying process.

    Frequently Asked Questions About Showing WordPress.org Reviews

    Here are a few questions that readers often ask me about showing WordPress.org reviews on their websites.

    How do I ensure WordPress.org reviews are updated automatically?

    Reviews Feed Pro automatically synchronizes with WordPress.org to pull in new reviews as they’re posted. The plugin checks for updates on a regular schedule, so your displayed reviews stay current without you needing to do anything.

    Can I customize which WordPress.org reviews are shown?

    Yes, you can filter reviews using several different methods within the Smash Balloon plugin. You can display only reviews above a certain star rating, filter by specific keywords that appear in review text, or use the banned words feature to exclude reviews containing unwanted terms.

    What should I do if I run into an authorization error with Smash Balloon?

    Authorization errors typically occur when the WordPress.org URL isn’t properly formatted or the connection has timed out.

    To fix this, you’ll want to double-check that you’ve copied the complete URL from the plugin or theme’s WordPress.org page. Then, try reconnecting through the Smash Balloon Reviews Feed settings.

    Are there limits to the number of reviews I can display with Smash Balloon?

    The plugin doesn’t put strict limits on review numbers, but displaying too many reviews on a single page can slow down your site’s loading speed. I recommend starting with 5-10 reviews per feed and testing your page performance before adding more.

    Further Reading for Using Reviews and Other Social Proof in WordPress

    I hope this guide has helped you show WordPress.org plugin or theme reviews on your site.

    If you found this useful, then you might like our other helpful guides on:

    If you liked this article, then please subscribe to our YouTube Channel for WordPress video tutorials. You can also find us on Twitter and Facebook.

    The post How I Turned My WordPress.org Reviews Into Powerful Social Proof first appeared on WPBeginner.